
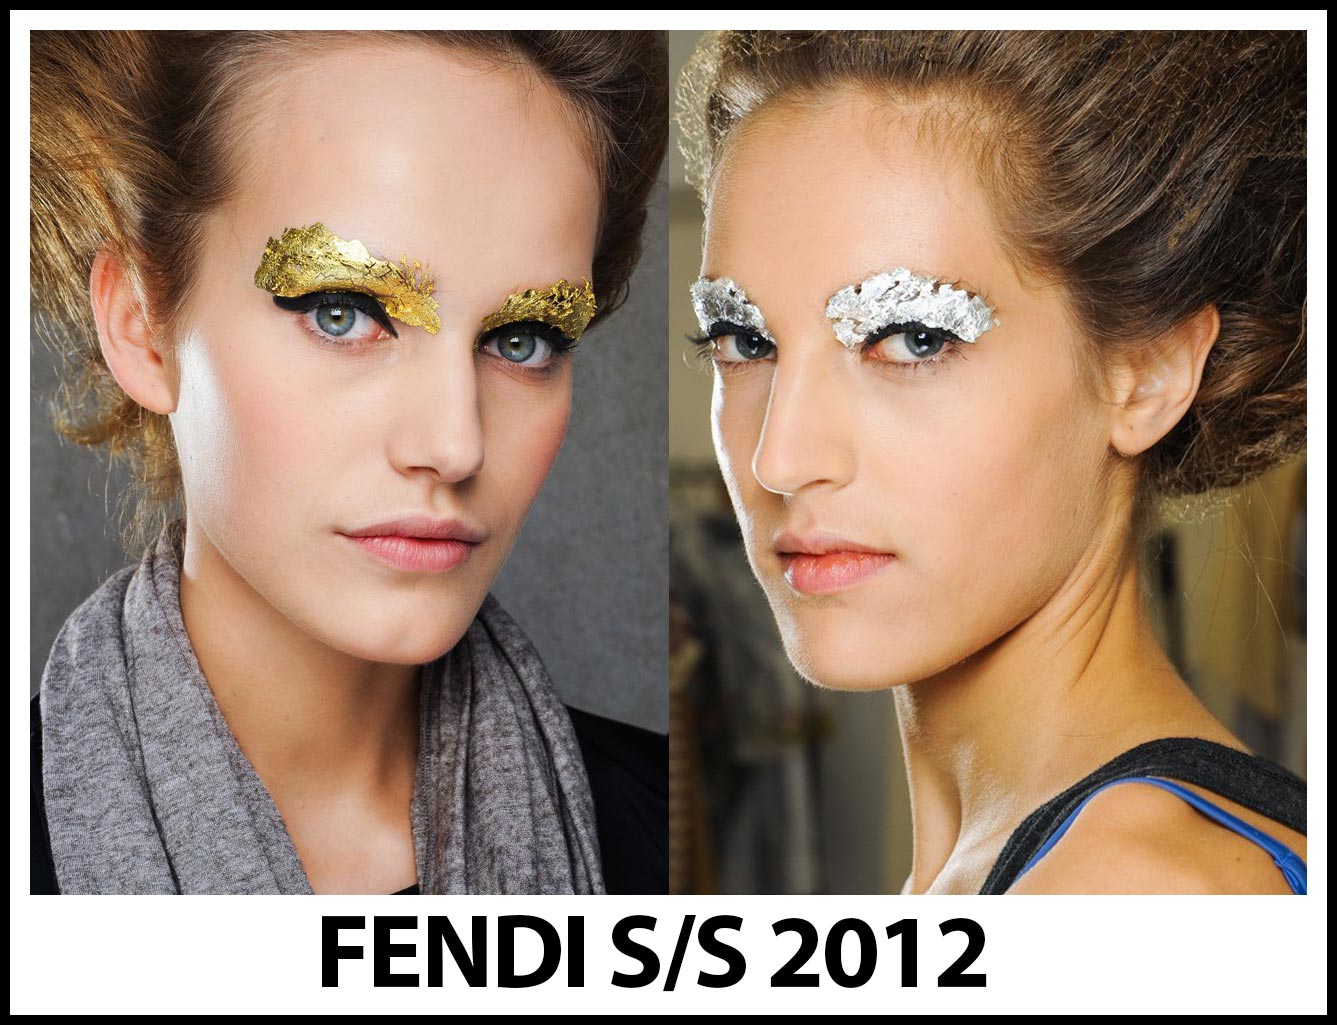
 The makeup for s/s 2012 Fendi's collection was done by Peter Phillips and to describe it in one word is easy: AMAZING. Anything with gold/silver foil is rich and incredible and instantly grabs my attention. This Skitch-I-Y makeup is perfect for standing out and also, Halloween is coming up so this makeup is perfect for the occasion. It's easily modifiable so you can adjust it to your goddess costume, or your egyptian pharaoh with a twist costume or any other eye catcher. You could also do it in smaller amounts or just a little gold leaf flake here or there. Emma Watson wore a similar makeup to the NY premiere of the last Harry Potter film. Just a few touches of gold leaf and she achieved instant "WOW!" factor. Pixiwoo have a fantastic tutorial video on this look and you can check it out here.
I got this tutorial together to show you guys how easy a look like this that can look quite complicated can be. I would have loved to set up a video tutorial, but my DSLR doesn't have that feature (looking to upgrade sometime in the future!), and the camera that does record is at my mom's house at the other side of the island. I didn't want to record on my mac because frankly, the image quality sucks, so I just took pictures of every step for you guys to see.

- Gold leaf (you can get it at your local art/craft store.
- foundation/concealer
- WASHABLE non-toxic glue stick
- DUO eyelash glue
- makeup brushes (An eyeshadow brush and a smaller brush for the lash glue. It would be better if it's a craft brush so you don't ruin your makeup brushes.).
- eyeliner (stick, gel or liquid)
- eyeshadow primer
- false lashes
- highlighting and dark eyeshadows
- mascara
- Fix + (optional)
- Eyelash curler (not shown)
- Spooly for your brows (not shown)
For the rest of the face you'll just need some powder, bronzer and gloss if you want to make it a bit more wearable.

Step 1: Prep and prime your face. I like to spritz a little MAC Fix+ on my face because it helps moisturize and soften my extremely dry skin. Add your eyeshadow primer to your eye lids.

 Step 2: Take your washable glue stick and spread some all over your brows so they lay flat on your skin. If you don't do this step, the gold foil will not stick gracefully on to your skin and you'll loose the effect. Make sure it is non-toxic glue. If it's safe for glue eating kiddies, it's safe for you. You could also use some makeup wax sold at your local makeup or costume shop but if you're on a budget, glue stick should do. Take your spooly and go combing your brows as you go so they can spread out and lay the flattest possible. Wait for the glue to dry completely before moving on. You may need to apply a few layers of glue depending on how thick your brows are.
Step 3: Conceal your eyebrows as much as you can. I'm out of concealer so I used my foundation for this. It didn't cover up as much as I would have liked but it did quite well and it doesn't matter as much for the bottom arch part of the brow since it will be masked quite a bit with dark eyeshadow.
Step 4: Grab you eyeliner and draw a cat-eye line over your top lash line. Smudge it out a bit and re-touch the liner line. I used my favorite liner, Milani Liquif'eye Metallic Eyeliner in black. It's comparable to Urban Decay's 24/7 eyeliner (in my opinion, even better and cheaper). Actually, any liner should do just as long as it can be smudged, is waterproof (due to the lash glue) and really black.
 Step 5: Cover your lids with a dark eyeshadow. I love how MAC's Beauty Marked has cool purple specks so I used that one but any black eyeshadow would be perfect. Take the shadow up to the brow and cover that too. If you notice, I left the liner line a bit exposed on the outer corners so I could use it as a guideline to apply the gold leaf later on.

Step 6: Take a brush (preferably a craft brush in this case) and apply a coating of DUO eyelash glue over the area you will apply the gold leaf. I've marked out the area on the picture. You might need to re-apply some glue as you go because it dries pretty fast and you may take a while applying the gold leaf if you've never done it before.

 Step 7: Take small pieces of gold leaf and go sticking them on to your lid with your finger. You want it to look wrinkly and organic so apply it in layers. It doesn't matter if some of the shadow underneath peaks out either as long as it doesn't peek through too much. That just makes it more interesting. Take the gold leaf all the way to your brow and cover it completely. You can leave asymmetric edges on the borders of the leaf so it adds interest and dimension. When applying on the lid, follow the line of your crease and do keep that edge clean and straight so you keep the cat eye liner showing.

Step 8: Curl your lashes and apply mascara. Take your false lashes and cut them in half. I got mine for $1.00 at Forever 21 and I've reused them a few times. Just make sure to wash them really well after each use. Take the outer corner of the lashes and apply some eyelash glue. Wait for the glue to get a bit tacky for a few seconds and place it on the outer corner of your lashes.
Step 9: Add a bit of highlighting shadow on the inner corner of your eyes. I'm using Phloof! from MAC. Brush off all of the fallout from your eyeshadow accumulated underneath your eyes with some concealer and you're done! For the whole face makeup, just add a bit of contouring bronzer along your cheekbones and some soft gloss on your lips. I'm using Urban Decay's Pocket Rocket lipgloss in Jesse. You want to keep the rest of the face simple (unless it's for some other type of costume makeup) because the eyes must be the main focal points here.

Here's the finished look:


I hope you enjoyed this easy Skitch- I-Y tutorial on this fantastic makeup. If you want to catch some fun behind the scenes looks at the Fendi s/s 2012 fashion show, click on the video below and see for yourself!
No comments:
Post a Comment