Thursday, June 28, 2012

The Big 100 Giveaway Winner!


After two long weeks of waiting, I finally have a winner to announce! I want to thank you all for entering the giveaway and being part of this journey. So, lets not wait any longer! The winner is...


Marie-Ève O.!!!

Congratulations Marie-Ève! I will be contacting you via e-mail to request your shipping information and I will be sending out your prize as soon as possible! I'll also work on a custom illustration for you and send it along with all the other goodies.

Thank you all so much for being a part of The Fashion Skitch. Stay posted because, who knows? I had so much fun working with this giveaway. I'm definitely going to do more!

Saturday, June 23, 2012

Any questions?

Hey guys! I hope that weekend is going great! If you've participated in my giveaway, you might
remember that one of the entry options was to leave a comment/suggestion/question/etc. on the comments section of that post. I've been getting quite a few questions lately and one of my readers has suggested I put up a frequently asked questions tab. I agree that it's quite a brilliant idea so, the purpose of the post is to ask you guys...

Photoboothin' at work? What? I had a good hair day!

Do you have any questions for me?

Seriously, ask away! You can ask me anything related to me or the blog that you would like to know. Maybe you want to know about how I got into blogging or what are my favorite beauty products? I'll round them up and select the majority of the questions that I find appropriate and well... frequent! I love to hear back from my readers so leave me a question in the comments below!  


Also, if you haven't entered my giveaway... WHAT ARE YOU WAITING FOR? Only a few days left to enter! 

Wednesday, June 20, 2012

Skitch-I-Y: 4 Different Ways to Wear Blue


If you've ever found the most beautiful blue eye product, bought it and got frustrated because it seems that whichever way you apply it makes you look like a clown, don't feel bad. It's happened to all of us. Although blue seems like an easy color to pull off, it's very hard to do sometimes because overdoing it or choosing the wrong blue may go from spectacular in the package to clown-tastic on your face! Alike lots of colors, it's all about what tone of blue you chose and how you wear it. It all comes down to balance.

photo via style.com
I must admit I wasn't too keen on wearing blues because somehow I always ended up looking kind of sick because I've got deep set eyes and quite a bit of dark circles under them, so I used to stray a bit from blue and shun it with fear and you all know that I do not fret when it comes to wearing bold colors with my makeup. It's a little strange because blue is actually the color that best suits my eyes. Well, lately I've been kind of obsessed with the color and I've recently gotten some super sweet blue hues for my lids. I decided to give blue a try and boy, I'm not going back! I've gone from hesitant to bold! Also, I'm really excited because it's a color that was featured on many runways for fall.  Prabal Gurung had his heaven and hell models with bold cobalt smokey eyes. So believe me when I say, I'm VERY excited for fall makeup trends.

Here are the 4 different way's I've used to solve my blue-eyed dilemma:


 Cobalt Waterline


This is the look I wear the most being as I'm a sucker for cat eyes. The easiest way to play up a simple look is with bold colored eyeliner. This is the most moderate way to add a touch of color that impacts enough to make a statement. You can actually play with any tone of blue here since the rest of the look is so toned down. Same goes for the rest of the face. Since this eye look is demure but just the right amount of bright, you can play up your lips. 


For this look I used Wet n' Wild's Mega Liner in Black, NYX's Retractable Eye Liner in Deep Blue, MAC's Sea and Sky and on my lips I went with Lanvin x H&M's Red. On my cheeks I went with Gosh's Cheeks and Lips in Back to Nature. 


            Blue Wing

This one basically keeps the same principle as the Cobalt Waterline look: simple but bright. Instead of doing a typical black wing, turn it blue! But be warned, if the tone is too light, well... it might look just plain bad. You want to keep it classy. Go for a deep navy for a classic look or a cerulean for a playful look. Anything lighter and you've eliminated any tastefulness for this look. With this eye, you've got space to play around with the rest of the face since it's quite toned down. Add a bright pink lip or a beautiful coral for summer. For more formal affairs, go with a blush lip tone.


I kept mine playful because I wanted something suitable for the bright summer trend so I went with NYX's R.E.Y. in Deep Blue with a light dusting of Warpaint's Totes Turq over it and MAC's Pfloof! for inner eye highlighting. For cheeks I used Gosh's Cheeks and Lips Back to Nature with a little bit of Nars' Sin and for lips I went with Sephora's Hot Hues Lipbalm in Paradisso Purple with Covergirl's Eternal layered over it.


                      Blue Slate

This is probably the hardest one to pull off since the color borders on what could go right or wrong, but done right and it can play up any eye color (at least in my opinion it can!). Go for a more silvery blue and a soft navy crease with a simple liner for better eye definition. Apply some of that navy underneath you bottom lash line and keep the waterline either dark for a look that smolders or light for a bigger looking eye. A tip I learned from Marlena of Makeup Geek: if your eyes are cool, keep the rest warm to balance out the look and vice versa.


For this look, I used MAC's Sea and Sky, the blue shadow in Mark.'s On the Dot compact, and MAC's Pfloof! I also used my NYX Deep blue liner. For cheeks I went with Nars' Orgasm and on my lips, some NYX Matte Lip Creme in Stockholm and Hot Topic's Foil Lip Gloss in Batch #F1711.


       Smokey Jewels

Save this look for the extra special events, although if it were me I'd use it for everyday. To get extra pay-off always start off with a dark base color. Any cream shadows (in moderation to prevent creasing!!!!) should do the trick. Layer over it a deep blue and take it all the way up to the crease. You can choose to use a lighter blue to blend it out or neutralize the brightness like I did with a orangey-brown color. Highlight the brow bone and inner eye corners. Take a bit if that dark color to the outer corner of your lower lid. Remember to keep the rest of the face soft as this eye look is very strong. Balance, my loves, is key.

For this look I used Tarina Tarantino's Creme Shadow in Meteor Night, MAC's Sea and Sky (you can tell I love it), both MAC's Blue Brown and Saffron on the crease and MAC's Amber lights for a jewel toned effect and contrast on the inner corner highlight. On the rest of the face, I stuck to Gosh Cheeks and Lips in Back to Nature and NYX's Soft Matte Lip Cream in Stockholm and Hot Topic's Foil Lip Gloss in Batch #F1711.


I invite you all to give blue a shot and be wise on your color selection and balance. Blue is a challenging color for eyes, but nothing anyone can't master. 

Also...


... if you're wondering about my jewelry, I want to thank the amazing Miss Erika Peña for creating such AMAZING pieces. I am literally obsessed with these earrings! These are hot off the oven and they've just arrived to the boutique!  Love the geometrical shapes and structure! They go perfectly with the kasar finish of my Ulan ring. Shop 'til you drop for more of her amazing accessories at www.erikapenashop.com or stop by her Facebook page: www.facebook.com/erikapenaboutique for more details.

Also, don't forget to enter my Big 100 Giveaway if you haven't for your chance at some sweet swag! Stop by my Facebook page and follow me on Tumblr and Instagram. I'm LilaLane! See you guys next time! 

Wednesday, June 13, 2012

The Big 100 Giveaway! CLOSED


There are absolutely no words to describe how excited I am that The Fashion Skitch has reached the 100 Likes on Facebook! I am extremely grateful that you have all given my blog a chance being as this is a project I've been carrying out for a while now as a way to keep me constantly illustrating. Let me tell you, it works! Also, I was always creating things here and there so I thought that putting up this blog would be a great way to archive all my ideas and share them with my friends. I never imagined it would be the success it has been! It only makes me want to create more posts and keep you guys entertained, even if it's just for a quick read.


I was anxiously waiting for the moment that Like counter hit 100 so I thought up of the best way to say thanks and that's with a giveaway! It wasn't easy picking out the prizes but I thought that it would be cool if I chose a prize that would reflect the three most important factors of my blog: DIY, fashion and beauty. So here's what's up for grabs:


Anna Sui's "Live Your Dream" 


"Live Your Dream by Anna Sui is a floral woody musk fragrance for women, introduced in 2009. Top notes are floral notes, white pepper and lily-of-the-valley; middle notes are jasmine and Bulgarian rose; while base notes are sandalwood, tonka beans, musk, cedar and teak wood."

I had been meaning to get this for a while and I thought it was a fantastic prize as I've featured Anna Sui in my blog before. I think it's quite a summery perfume and it could suit anybody. Rose scented perfumes have been present in my perfume stash since I could remember and it's a scent dear to my heart. I love the rosy notes in it (you all know I love rose scented things!) and how sweet it is. In my opinion, it's a very nice every day perfume. I even got one for myself! 


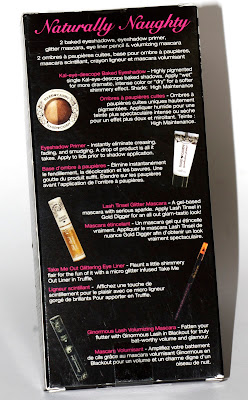
Hard Candy's Naturally Naughty Mini Must Haves


Absolutely love this kit! Hard Candy products are super cool and when I saw this, I thought it was a fantastic treat! The shadows suit every skin tone and don't even get me started on that gold glitter mascara. What a way to play up any eye look! The kit also includes an eye liner, a volumizing mascara and an eyeshadow primer.


Dream Away!


I've been making these ever since I needed some extra cash during my first year of college. I've had one over my bed ever since my mom gave me my first one when I was seven. A dreamcatcher like this one I'd sell at around $60. This is a one of a kind piece because I really don't like to repeat my dreamcatchers. After all, it's your dreams it will catch so that's why I prefer to make only one of each. Hang it over your bed and dream away!


Some Sweet Neon Arm Candy!


Friendship bracelets and neon: two of summer hottest trends summed up in one. Get that arm candy going with a bright fella like this one made by yours truly!

I'll also be adding to the package a little personalized illustration but I will sketch it out once I know the winner.


OK! So now that you know what's up for grabs, here's what you've got to do:
  • You must be subscribed to this blog. You can subscribe via Google Friend Connect. You don't have to have a Blogger account for that. You could do it via Twitter or even Yahoo! The link is on the right bar of my blog. 
  • You must be liking my Facebook page: www.facebook.com/TheFashionSkitch
  • Leave a comment below with your e-mail and any suggestions, requests, or simply any thoughts on my blog. If you leave any critiques, make sure they're constructive!
  • Tweet about it! Use the Rafflecopter to link it directly to your Twitter.
The giveaway will be closed June 28, 2012 at 12:01 am.


To make sure you've followed all the steps listed, fill out the Rafflecopter to enter. After the 28th I will close the giveaway and choose a winner. I will post the winner and be in contact via e-mail. I wish you all good luck but most of all, I want to once again thank you for all of your support! I genuinely appreciate it!


And the winner is....
Marie-Ève!


Saturday, June 9, 2012

The Fashion Skitch Hit the Big 100 on Facebook!


The Fashion Skitch hit the big 100 on Facebook! It’s time to celebrate by giving back to all of you who have supported me, my blog and my work. I’m so thankful to you all so I’ll be working on a giveaway during the weekend! It has been quite a journey so far and I'm loving it. This has been the best way to channel my creativity and to keep me focused and motivated. I take great joy in sharing my thoughts, ideas and creations with you all. Stay posted for more details during the next few days! 
Instagram: LilaLane

Thursday, June 7, 2012

Skitch-I-Y: Ombré Nails!


Hi guys! What a week! I've been working on some freelance illustration plus my day job and I promised I'd post as soon as I finished working on that but I'm going to be quite a bit more on it so I decided I'd take a break and post about my first attempt at ombré nails. I am extremely happy with the results and I can't say enough good things about my color choice. LOVE IT! How more cheerful can you get? I've been working on some personal aspects in my life and they're taking quite a good spin so I thought these colors would reflect my positivity. Let's get started!

You'll need: 


  • At least two nail varnish colors of your choice.
  • Base coat
  • Top coat
  • Beauty sponge
  • Q-tips
  • Nail Polish remover
  • water 


Step 1: Prep and apply a base coat to your nails. I've been using Bettina's Stick It Base Coat for a while now and I am loving how good it is! I've had my ombré for about three almost four days and not a single bit of chipping so far. NOTHING. Usually I would already be re-touching since my nails are so brittle. And the price was another clincher for me. Under $5! 


Step 2: After your base coat dries, apply two coats of your first color of choice. I went for my new polish obsession: Bettina's Green Apple. I've already used it in three consecutive manis, including a splatter nail, or how I like to call it, a "Jackson Pollock nail". You can see it here. Let me know if you'd like a tutorial on that!  The only downside is that it's a potent color. Pretty much changes any other color layered over it as you may see on this tutorial.


Step 3: After your base color has dried, take your sponge and dip it in water. Wring out the excess water. It should be moist but not too dry or else the color won't transfer smoothly. Practice makes perfect here. Take your sponge and dip it in your other color or brush some polish onto the sponge. I prefer swiping the brush on the sponge to prevent the polish from drying. 


Step 4: Start dabbing your colored sponge over the area you want to ombré little by little. You might need to be patient to achieve your desired tone as the sponge might absorb the color. Work it gradually until you've got no visible lines and your color is even. If necessary, clean off your edges with some nail polish remover and a q-tip.


After it dries, apply a good coat or two or top coat and you're done! Instead of a glossy coat, I decided to go matte to give this bright, summer nail an extra umph! I used NYC's Matte Me Crazy. I like it! No chipping so far. A little inner cracking but it's to be expected at this point and it only cost me $2.19. Yes!


If you try out the ombré nail, show me! Experiment with colors, textures and tones. You can link me in the comments below, post on my Facebook page or tag me on Instagram! I'm LilaLane. See you soon with a few more DIY's, beauty and fashion posts I've got lined up. Hopefully I can get them all done before I move to NY! 

Friday, June 1, 2012

The Skitch: Mary Katrantzou S/S 2012


These late night sketch parties I'm having with myself are really paying off (must be those nerves of mine keeping me up!) and with my lastest picks for skitches, I'm coming to a conclusion: I'm turning over to the print side little by little. Or at least I'm venturing a bit with something other than blocked colors in heavy tones. I may not be as bold as to wear something as "printastic" as Mary Katrantzou (also because it's out of my reach), but her pieces sure make a hell of a statement when it comes to fashion vis à vis art. She trumps all other print master in my book (sorry, Pucci!). Graphic synergy at its highest expression.

With this one I tried to use many different brushes so I had fun playing around. Much more expressionist than my other illustrations, but I definitely thought it was proper... at least to catch the essence of the prints. Here's my favorite outfit from her s/s 2012 runway show. The flowiness of the pleated skirt is just divine for summertime!

Would you guys be bold as to wear a Mary Katrantzou-like print? Let me know in the comments below! 

pic via style.com
reserved rights D. Velazquez 2012

LinkWithin

Related Posts Plugin for WordPress, Blogger...